A virtual machine is the perfect solution to trying out programs and operating systems, finding errors, and much more, all without putting your computer at risk.

It must have happened to you at some point. Someone recommends you a program, but you don’t fully trust it, either because its functions could put your computer at risk or because you don’t fully trust the source that recommended it.
Maybe you find yourself in a situation in which you want to familiarise yourself with a different operating system, such as one of the many versions of Linux or other more “exotic” systems such as FreeBSD.
Or perhaps you are required to work with an old program, one that is compatible with an older version of Windows, meaning that your computer could be vulnerable to external attacks. However, you want to keep the most recent version on your computer, but still continue using said program.
In all three cases, and many others, the best solution is to turn to a virtual machine. This offers multiple advantages: it is secure, you can get rid of the machine with a single click, it won’t damage your computer…
What is a virtual machine?
Let’s start at the beginning. What is a virtual machine? A virtual machine is a program that simulates a computer. It simulates the CPU, RAM memory, hard drive, graphics card… All with the help of the computer itself.
This is highly practical because you can install any operating system on a virtual machine, even if it is incompatible with your computer’s characteristics. Therefore, you can use old programs that are only compatible with obsolete versions of an operating system, or try out new operating systems without formatting your PC.
On the other hand, the virtual machine communicates with your computer’s operating system to a limited degree, which protects the system installed in your PC from the system installed in the virtual machine. This way you can try out delicate programs, check if a program is infected, or perform certain operations without putting your files at risk.
Inconveniences of a virtual machine
This is all well and good, but surely you are wondering what are the disadvantages of using a virtual machine.
Firstly, executing two operating systems at the same time (one in your PC and the other in the virtual machine) represents twice the effort for your computer. If you are short on resources (CPU, RAM, graphics card), it is possible that performance for both of them will be compromised. Therefore, you have to find the proper configuration balance for the virtual machine.
A second inconvenience is related to the nature of the virtual machine. Because it is a virtualization, obviously the virtual hardware does not operate in 100% the same way as the real one. This particularly affects aspects such as graphics virtualization if you want to use programs that use a lot of resources or that need to use the entire graphics card, such as video games or image- and video-editing tools.
Creating a virtual machine with VirtualBox
There are various solutions for creating virtual machines. The most popular are VMware, VirtualBox and Parallels. All three are very good and fulfil, and end even exceed, their purpose. In addition, each new version offers new functions, improves the current ones, and provides compatibility with the most recent versions of the compatible operating systems.
For this article, I have decided to focus on VirtualBox for a number of reasons. First off, it’s free. Second, it provides a good balance between memory and CPU usage. And, lastly, is simple to use.
Step 1 – Install VirtualBox
You can install VirtualBox on Windows, Mac and Linux. All you have to do is download the installer and follow the instructions.
Normally, you won’t have to change anything, but it’s a good idea to read the options displayed on the screen to know what you are accepting and where the virtual machines will be stored.
Step 2 – Configure your virtual machine
Once you have installed VirtualBox, you can create your first virtual machine. There is no limit to how many virtual machines you install, but it is recommended that you run them one at a time, rather than multiple at the same time.
To create a virtual machine just click on New in the VirtualBox main window.
The assistant will guide you step-by-step. First, you have to name your machine, “VirtualBox Test” for example. Next, choose the operating system and its version from the long list of those available.
Next, you will have to choose how much RAM memory to assign the virtual machine. You will see a selection bar that highlights in different colours the minimum required amount, the desired amount, and the optimal. For the maximum amount, you can assign all your RAM, but keep in mind that this will leave your computer’s operating system without any, and will therefore be compromised. The default amount that appears is fine, but if it seems too little, you can adjust it later on once you have tried out the virtual machine.
You can also choose the size of the virtual disk. In this case, that disk will be a file that simulates a hard drive. You can create a new one or use a pre-existing one if you are using an already created virtual machine. Regarding the disk format, this depends on whether you are going to use it with other virtualization programs other than VirtualBox. The default option, VDI, is the most desirable if only using VirtualBox. You can also give it a set size that will continue to grow according to the files you save there. Lastly, you must name it; people usually use the same name as the VirtualBox.
Step 3 – Start up the virtual machine for the first time
You’ve created your machine. Now you get to start it up and use it. However, one important step remains, because a new virtual machine is just like a new computer: it doesn’t have an operating system.
Before starting the machine, make sure that you have installed the operating system. In the case of open source systems such as Linux, Solaris or FreeBSD, you can get a free ISO image from their official pages. In the case of Windows, you will need the physical disk or ISO image for the most recent versions.
In order for the virtual machine to detect the installer upon start-up, you must select the virtual machine in the VirtualBox main window, and click on Parameters, then in Storage, click on the CD/DVD shaped icon. Click again on the same icon on the right side and choose one of the options: use a virtual optical disk file (usually ISO) or the physical disk in your CD/DVD drive.
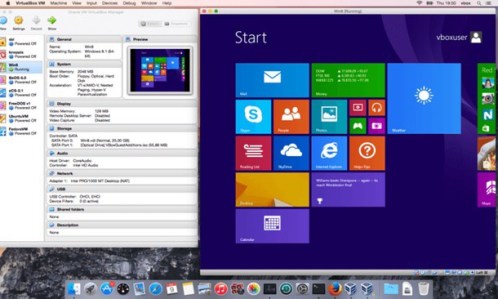
After accepting, you just have to click on Start and the virtual machine will boot up like a computer. You can view the machine within a window or have it take up the entire screen. The operating system installer will guide you step-by-step. Remember that changes will only affect the virtual machine, not your computer.
Step 4 – Other settings
Once you have installed the operating system, you can now use the virtual machine. As an option, you can install Guest Additions in the virtual operating system to improve communication with your computer’s operating system and thus share files or enhance the graphics.
This option is essential to sharing folders between your PC and the virtual system, for example.
Lastly, I would like to emphasis that you can do the exact same things with the machine as with a computer, and more. You can re-start the virtual machine, shut it down, disconnect hardware elements, add new virtual components… And most practical of all, you can pause it and resume later, to not constantly be shutting down and starting the virtual machine.
Image | Pexels (Author: Negative Space)